Windows so far has been a forte of ours. We have worked with it for a lot of years already. But as the versions go up, a lot of the “we used to see it here before” is a common occurrence. Let’s journey together into the magical windows world.
For you to enter the BIOS, you need to click Shift+F10. Once you are there, you can type in the command prompt : OOBE\BYPASSNRO
Press enter and it will restart the device. The next setup will give you the option to click “I don’t have internet” and bypass the network connection.
I have seen a few computations done in interbase and a lot of them have trailing decimals after them and if we want to round them manually, this is what I have come up with.
Suggestions and alternative solutions are always welcome. I am using a few variables so I can see the results of the computation as they unravel.
Recently a lot of apps right now are becoming internet dependent. Currently the project I am working on requires the system to know if there is internet or not.
Here is the code snippet I found
uses WinInet;

var
  origin: cardinal;
begin
  if InternetGetConnectedState(@origin,0) then
    ShowMessage('Connected!')
  else
    ShowMessage('Not connected')
  end;
end;
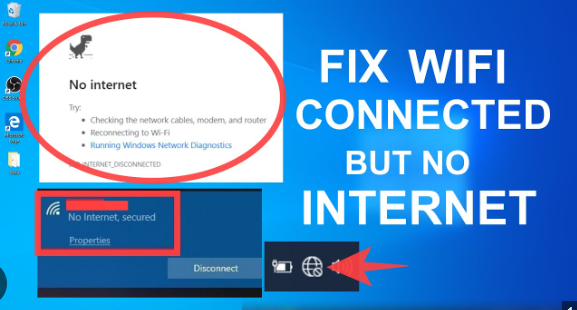
Recently we had this issue with our Globe fiber wifi setup. After August 1, 2024 (need to check this one as well), wifi sticks are having a hard time getting internet. We can see that the wifi is connected but no internet is received.
at first the culprit might be the wifi stick. standing that we have been using it for months and years, is there a cut-off for them as well?
second is the wifi router itself. is it defective or have reached the limit of 60 devices (based on the manual that i read) ?
So far what we did to solve this issue is to use the command prompt and then issue a ‘ipconfig / release’ and ‘ipconfig / renew’ command and viola! It’s now working.
This shortcut has been a game changer for me using Windows 10 since the old days of using Alt+Printscreen and then opening Ms Paint.
Recently, and not really sure what happens but it occasionally breaks down and needs to be reset. Thankfully here are the steps to do it. What i used is Step 3.
Fix Windows + Shift + S Not Working Windows 10 – 4 Ways
Way 1. Turn on the Clipboard History Switch * Press Windows + I to open Windows Settings. And click System. * Next click Clipboard in the left panel. Scroll down in the right window to find Clipboard history option. * Make sure the Clipboard history switch is enabled and is in On status.
Way 2. Make Sure Snip & Sketch Is Enabled * Still, you can press Windows + I to access Settings window. Click System. * Next click Notifications & actions in the left pane. * Scroll down in the right window, and find Snip & Sketch. Make sure it is turned on.
Way 3. Reset Snip & Sketch Snip & Sketch is the successor of the Snipping Tool in Windows 10. You can also try to reset Snip & Sketch to see if it can fix Win Shift S not working error in Windows 10.
* Click Start -> Settings to enter into Windows Settings screen. * Click Apps -> Apps & features. Click Snip & Sketch in the right window and click Advanced Options link. * Click Reset button in the pop-up Snip & Sketch window to reset this Windows 10 screen capture tool.
Way 4. Reinstall Snip & Sketch You can also try to uninstall and reinstall Snip & Sketch app from Microsoft Store to see if the Windows Shift S not working issue can be fixed.
* Press Windows + I, and click Apps -> Apps & features. * Scroll down in the right window to find Snip & Sketch app, and click the Uninstall button to remove it from your Windows 10 computer. If the Uninstall button is grey, you can learn how to uninstall programs with CMD or PowerShell. * Then you can open Microsoft Store to search the Snip & Sketch app to reinstall it on your Windows 10 computer.
The original title should be “the hash for the file is not present in the specified catalog file”. I had recently encountered apps not being installed because the has file was not there. And then i wondered. Why would software developers deploy programs without this hash thing.
After a few google searches it turns out it was microsoft thing and you can disable it.
Enjoy
Coffee Cup
To solve this problem, I had to disable Device Driver Signing. Here’s how it’s done in Windows 10.
Option 1 – Command to Enable or Disable
Click the “Start” button.
Type “command“.
Right-click on “Command Prompt” and select “Run As Administrator“.
Do one of the following:
To disable device driver signing, type “BCDEDIT /set nointegritychecks ON” then press “Enter“
To enable device driver signing, type “BCDEDIT /set nointegritychecks OFF” then press “Enter“
You’re done! The Device Driver setting is now modified.
Option 2 – Disable From Menus
I figured this was security that was built into Windows to prevent me from installing bad drivers. This is a feature called Device Driver Signing. After going through the steps to disable driver signing in Windows 8, I was able to get my community drivers installed. Here’s how I did it.
Select the “Start” button.
Type “startup”.
Select “Change advanced startup settings“.
Select “Restart now” under the “Advanced startup” area.
Select “Troubleshoot“.
Select “Advanced Options“.
Select “Startup Options“.
Select “Restart“.
A menu will appear where you can press “7” on your keyboard to choose “Disable driver signing enforcement“.
Now Device Driver Signing should be disabled, allowing you to install any driver you like in Windows 10 until you reboot.
If you have complaints related to Thumbnail previews on your Windows 10, then simply try these fixes.
Check File Explorer Settings
Change Visual Effects Settings
Clear Thumbnails Cache
Modify Windows 10 Registry Settings
Edit Group Policy
Restore File Explorer Settings
Check File Explorer Settings
Type File Explorer Options in the search box of your Windows 10 system and select the option File Explorer Options.
2. A dialog box namely File Explorer Options will get opened. Here, switch to the View tab, and under the Advanced Settings section, ensure that Always show icons, never thumbnails option is not selected. If it is selected, then unselect it. Then, select OK.
3. If the option was selected, then deselecting it might solve your problem.
Change Visual Effect Settings
On your Windows 10 system, search View advanced system settings and select the same search result to open it.
Next, a dialogue box System Properties will get opened. On the Advanced tab, click the Settings option under the Performance section.
The Performance Options dialogue box will get opened. On the Visual Effects tab, under the Custom section, select two checkboxes – Save taskbar thumbnail previews and Show thumbnails instead of icons. Click on OK to save the changes.
Now, check if thumbnails previews appear again.
Clear Thumbnails Cache
Go to the Search menu and type Disk cleanup. Select the search result Disk Cleanup.
Next, you need to select the system drive on which you want to perform the scan and cleanup. Click OK after the selection.
The drive scanning process will get started. Wait till it finishes.
Now, on the Disk Cleanup for System dialogue box, select Thumbnails and Temporary files checkboxes under Files to delete section. Click OK to delete the selections.
5. It will delete the current (may be corrupted) Thumbnails cache from your system drive and Windows will create the new cache again on need.
Modify Windows 10 Registry Settings
Press the Windows button and R alphabet on the keyboard together. Type regedit and click on OK.
The Windows Registry Editor page will get opened. Go to the following locations one-by-one and create a DWORD name with “Disable Thumbnails” and set its value to 1 and click OK. (Value 1 = Disabling DWORD, Value 0 = Enabling DWORD.
3. Exit the Registry Editor and restart the system.
Edit Group Policy
Type gpedit.msc in the Windows 10 run box (press Windows and R together) and click OK.
The Local Group Policy Editor page will get opened. Here, on the left panel, follow this location –
User Configuration>Administrative Templates>Start Menu and Taskbar
3. Now, from the right panel, double click on the option Turn off taskbar thumbnails.
4. On the next page, select the Disabled option and click OK.
5. Also, on the main Local Group Policy Editor page, move to this location –User Configuration>Administrative Templates>Windows components>File Explorer. Expand File Explorer.
6. From the right panel, double-click on Turn off the display of thumbnails and only display icons.
7. Again select Disabled option and click OK.
8. Now exit the Local Group Policy Editor and restart your Windows 10 system.
Restore File Explorer Settings
On the Search menu of your system, type File Explorer Options, and from the search result, click on File Explorer Options.
The File Explorer Options page will get opened. Here on the General tab, click on Restore Defaults option.
3. Perform the same on the View tab.
4. Wait till the restoring gets completed. Click OK.
Recently i have acquired a Razen Seiren Mini to test voice recording without any background noice and clear crisp quality. Hera are the steps on how to install on your pc.
To set up your Razer Seiren Mini, follow the steps below.
Take the device out of the box and assemble the base.
Fasten it securely to the thread mount of your Razer Seiren Mini.
Connect the microphone to the USB port of your PC using the Micro-USB to USB cable.
Right-click on the sound icon on the system tray of your PC and select “Open Sound settings” and set Razer Seiren Mini as the default Input device.
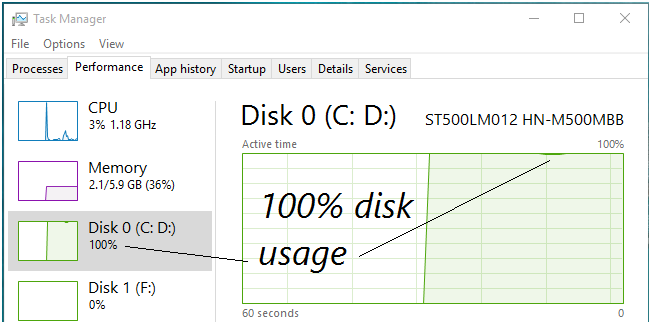
Sometimes you encounter a PC that when you look at the task manager, you go ‘holy cow!’, it’s running on 100% disk usage for a long, long time.
Believe me, that’s quite normal but solvable.
Here are the steps that I did to help bring it down.
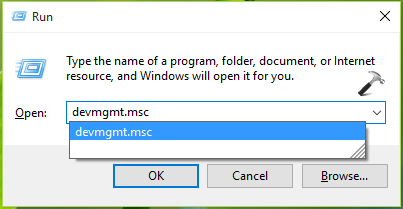
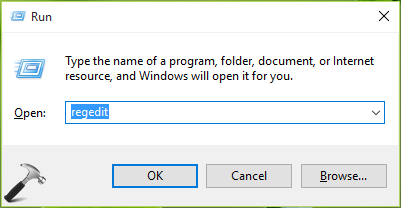
1. Press + R and type devmgmt.msc in the Run, hit Enter key to open Device Manager snap-in.
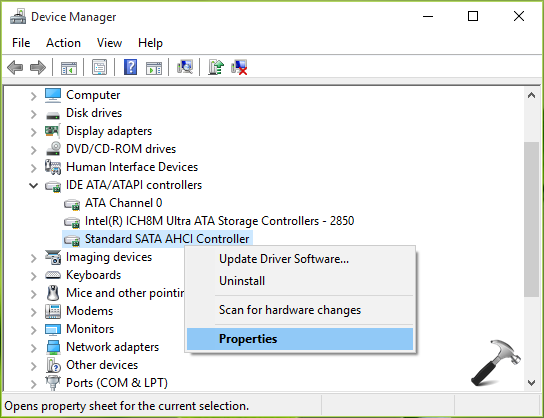
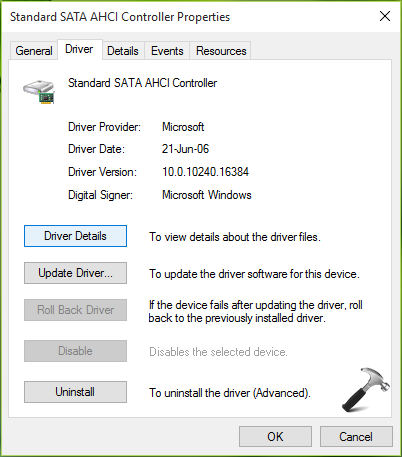
2. In the Device Manager window, expand IDE ATA/ATAPI controllers and right click on Standard SATA AHCI Controller, select Properties.
3. In the property sheet, switch to Driver tab and click Driver Details.
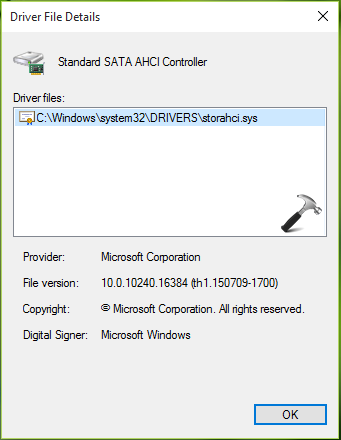
4. If the Driver File Details window shows storahci.sys driver listed there, it means you’re running inbox driver and hence it is possible to disable MSI mode. Click OK.
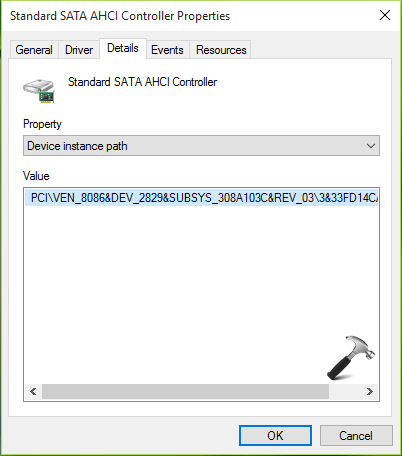
5. Back on the property sheet, switch to Details tab. Against Property, select Device instance path from drop-down and note down the Value mentioned there.
6. Press + R and put regedit in Run dialog box to open Registry Editor (if you’re not familiar with Registry Editor, then click here). Click OK.
7. In the Registry Editor window, navigate to following registry key:
Substitute <AHCI Controller Value> we got in step 5.
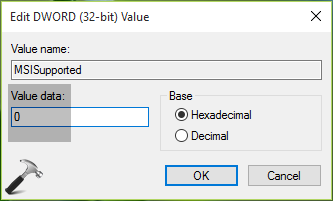
8. In the right pane of MessageSignaledInterruptProperties key, look for the registry DWORD (REG_DWORD) named MSISupported which should be corresponding to Value1 as its Data. Double click on the DWORD to modify its value:
9. Finally, set the Value data as 0 and click OK. Close Registry Editor and reboot. After restarting your machine, the 100% disk usage problem should disappear.